This chapter summarizes the individual administrative tasks you can
perform with the LVM Command Line Interface (CLI) commands to create and
maintain logical volumes.
There are several general features of all LVM CLI commands.
When sizes are required in a command line argument, units can always
be specified explicitly. If you do not specify a unit, then a default is
assumed, usually KB or MB. LVM CLI commands do not accept fractions.
When specifying units in a command line argument, LVM is
case-insensitive; specifying M or m is equivalent, for example, and
powers of 2 (multiples of 1024) are used. However, when specifying the --units
argument in a command, lower-case indicates that units are in multiples
of 1024 while upper-case indicates that units are in multiples of 1000.
Where commands take volume group or logical volume names as
arguments, the full path name is optional. A logical volume called lvol0 in a volume group called vg0 can be specified as vg0/lvol0.
Where a list of volume groups is required but is left empty, a list of
all volume groups will be substituted. Where a list of logical volumes
is required but a volume group is given, a list of all the logical
volumes in that volume group will be substituted. For example, the lvdisplay vg0 command will display all the logical volumes in volume group vg0.
All LVM commands accept a -v argument,
which can be entered multiple times to increase the output verbosity.
For example, the following examples shows the default output of the lvcreate command.
# lvcreate -L 50MB new_vg
  Rounding up size to full physical extent 52.00 MB
  Logical volume "lvol0" created
The following command shows the output of the lvcreate command with the -v argument.
# lvcreate -v -L 50MB new_vg
    Finding volume group "new_vg"
  Rounding up size to full physical extent 52.00 MB
    Archiving volume group "new_vg" metadata (seqno 4).
    Creating logical volume lvol0
    Creating volume group backup "/etc/lvm/backup/new_vg" (seqno 5).
    Found volume group "new_vg"
    Creating new_vg-lvol0
    Loading new_vg-lvol0 table
    Resuming new_vg-lvol0 (253:2)
    Clearing start of logical volume "lvol0"
    Creating volume group backup "/etc/lvm/backup/new_vg" (seqno 5).
  Logical volume "lvol0" created
You could also have used the -vv, -vvv or the -vvvv argument to display increasingly more details about the command execution. The -vvvv
argument provides the maximum amount of information at this time. The
following example shows only the first few lines of output for the lvcreate command with the -vvvv argument specified.
# lvcreate -vvvv -L 50MB new_vg
#lvmcmdline.c:913         Processing: lvcreate -vvvv -L 50MB new_vg
#lvmcmdline.c:916         O_DIRECT will be used
#config/config.c:864       Setting global/locking_type to 1
#locking/locking.c:138       File-based locking selected.
#config/config.c:841       Setting global/locking_dir to /var/lock/lvm
#activate/activate.c:358       Getting target version for linear
#ioctl/libdm-iface.c:1569         dm version   OF   [16384]
#ioctl/libdm-iface.c:1569         dm versions   OF   [16384]
#activate/activate.c:358       Getting target version for striped
#ioctl/libdm-iface.c:1569         dm versions   OF   [16384]
#config/config.c:864       Setting activation/mirror_region_size to 512
...
You can display help for any of the LVM CLI commands with the --help argument of the command.
commandname --help
To display the man page for a command, execute the man command:
man commandname
The man lvm command provides general online information about LVM.
All LVM objects are referenced internally by a UUID, which is
assigned when you create the object. This can be useful in a situation
where you remove a physical volume called
/dev/sdf which is part of a volume group and, when you plug it back in, you find that it is now
/dev/sdk.
LVM will still find the physical volume because it identifies the
physical volume by its UUID and not its device name. For information on
specifying the UUID of a physical volume when creating a physical
volume, see see
Section 6.4, “Recovering Physical Volume Metadata”.
4.3. Volume Group Administration
This section describes the commands that perform the various aspects of volume group administration.
4.3.1. Creating Volume Groups
To create a volume group from one or more physical volumes, use the
vgcreate command. The
vgcreate command creates a new volume group by name and adds at least one physical volume to it.
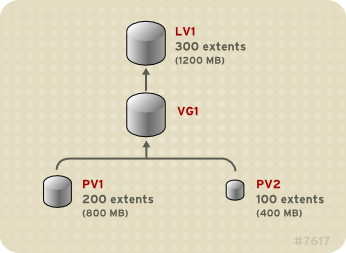
The following command creates a volume group named vg1 that contains physical volumes /dev/sdd1 and /dev/sde1.
vgcreate vg1 /dev/sdd1 /dev/sde1
When physical volumes are used to create a volume group, its disk
space is divided into 4MB extents, by default. This extent is the
minimum amount by which the logical volume may be increased or decreased
in size. Large numbers of extents will have no impact on I/O
performance of the logical volume.
You can specify the extent size with the -s option to the vgcreate
command if the default extent size is not suitable. You can put limits
on the number of physical or logical volumes the volume group can have
by using the -p and -l arguments of the vgcreate command.
By default, a volume group allocates physical extents according to
common-sense rules such as not placing parallel stripes on the same
physical volume. This is the normal allocation policy. You can use the --alloc argument of the vgcreate command to specify an allocation policy of contiguous, anywhere, or cling.
The contiguous policy requires that new
extents are adjacent to existing extents. If there are sufficient free
extents to satisfy an allocation request but a normal allocation policy would not use them, the anywhere allocation policy will, even if that reduces performance by placing two stripes on the same physical volume. The cling
policy places new extents on the same physical volume as existing
extents in the same stripe of the logical volume. These policies can be
changed using the vgchange command.
In general, allocation policies other than normal are required only in special cases where you need to specify unusual or nonstandard extent allocation.
LVM volume groups and underlying logical volumes are included in the device special file directory tree in the /dev directory with the following layout:
/dev/vg/lv/
For example, if you create two volume groups myvg1 and myvg2, each with three logical volumes named lvo1, lvo2, and lvo3, this create six device special files:
/dev/myvg1/lv01
/dev/myvg1/lv02
/dev/myvg1/lv03
/dev/myvg2/lv01
/dev/myvg2/lv02
/dev/myvg2/lv03
The maximum device size with LVM is 8 Exabytes on 64-bit CPUs.
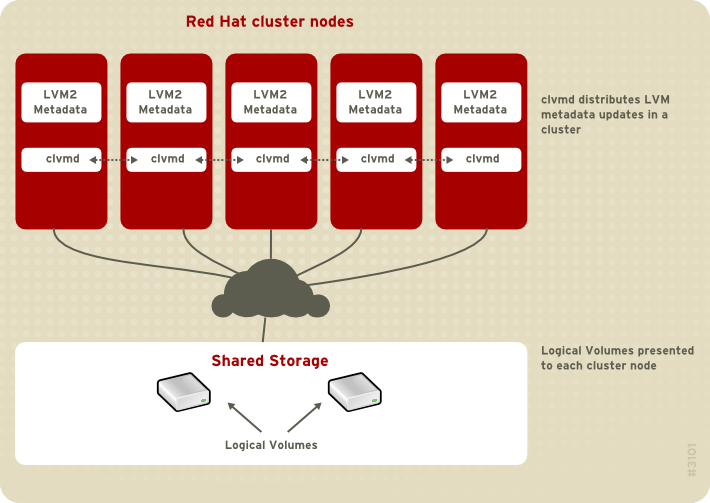
4.3.2. Creating Volume Groups in a Cluster
You create volume groups in a cluster environment with the vgcreate command, just as you create them on a single node.
By default, volume groups created with CLVM on shared storage are
visible to all computers that have access to the shared storage. It is
possible, however, to create volume groups that are local, visible only
to one node in the cluster, by using the -c n of the vgcreate command.
The following command, when executed in a cluster environment,
creates a volume group that is local to the node from which the command
was executed. The command creates a local volume named vg1 that contains physical volumes /dev/sdd1 and /dev/sde1.
vgcreate -c n vg1 /dev/sdd1 /dev/sde1
You can check whether an existing volume group is a clustered volume group with the vgs command, which displays the c attribute if the volume is clustered. The following command displays the attributes of the volume groups VolGroup00 and testvg1. In this example, VolGroup00 is not clustered, while testvg1 is clustered, as indicated by the c attribute under the Attr heading.
[root@doc-07]# vgs
  VG            #PV #LV #SN Attr   VSize  VFree
  VolGroup00      1   2   0 wz--n- 19.88G    0
  testvg1         1   1   0 wz--nc 46.00G 8.00M
4.3.3. Adding Physical Volumes to a Volume Group
To add additional physical volumes to an existing volume group, use the vgextend command. The vgextend command increases a volume group's capacity by adding one or more free physical volumes.
The following command adds the physical volume /dev/sdf1 to the volume group vg1.
vgextend vg1 /dev/sdf1
4.3.4. Displaying Volume Groups
There are two commands you can use to display properties of LVM volume groups: vgs and vgdisplay.
The
vgs command provides volume group information in a configurable form, displaying one line per volume group. The
vgs command provides a great deal of format control, and is useful for scripting. For information on using the
vgs command to customize your output, see
Section 4.8, “Customized Reporting for LVM”.
The vgdisplay command displays volume
group properties (such as size, extents, number of physical volumes,
etc.) in a fixed form. The following example shows the output of a vgdisplay command for the volume group new_vg. If you do not specify a volume group, all existing volume groups are displayed.
# vgdisplay new_vg
  --- Volume group ---
  VG Name               new_vg
  System ID
  Format                lvm2
  Metadata Areas        3
  Metadata Sequence No  11
  VG Access             read/write
  VG Status             resizable
  MAX LV                0
  Cur LV                1
  Open LV               0
  Max PV                0
  Cur PV                3
  Act PV                3
  VG Size               51.42 GB
  PE Size               4.00 MB
  Total PE              13164
  Alloc PE / Size       13 / 52.00 MB
  Free  PE / Size       13151 / 51.37 GB
  VG UUID               jxQJ0a-ZKk0-OpMO-0118-nlwO-wwqd-fD5D32
4.3.5. Scanning Disks for Volume Groups to Build the Cache File
The vgscan command scans all supported
disk devices in the system looking for LVM physical volumes and volume
groups. This builds the LVM cache in the /etc/lvm/.cache file, which maintains a listing of current LVM devices.
LVM runs the vgscan command automatically at system startup and at other times during LVM operation, such as when you execute a vgcreate command or when LVM detects an inconsistency.
You may need to run the vgscan command
manually when you change your hardware configuration and add or delete a
device from a node, causing new devices to be visible to the system
that were not present at system bootup. This may be necessary, for
example, when you add new disks to the system on a SAN or hotplug a new
disk that has been labeled as a physical volume.
The following example shows the output of a vgscan command.
# vgscan
  Reading all physical volumes.  This may take a while...
  Found volume group "new_vg" using metadata type lvm2
  Found volume group "officevg" using metadata type lvm2
4.3.6. Removing Physical Volumes from a Volume Group
To remove unused physical volumes from a volume group, use the vgreduce command. The vgreduce
command shrinks a volume group's capacity by removing one or more empty
physical volumes. This frees those physical volumes to be used in
different volume groups or to be removed from the system.
Before removing a physical volume from a volume group, you can make
sure that the physical volume is not used by any logical volumes by
using the pvdisplay command.
# pvdisplay /dev/hda1

-- Physical volume ---
PV Name               /dev/hda1
VG Name               myvg
PV Size               1.95 GB / NOT usable 4 MB [LVM: 122 KB]
PV#                   1
PV Status             available
Allocatable           yes (but full)
Cur LV                1
PE Size (KByte)       4096
Total PE              499
Free PE               0
Allocated PE          499
PV UUID               Sd44tK-9IRw-SrMC-MOkn-76iP-iftz-OVSen7
If the physical volume is still being used you will have to migrate the data to another physical volume using the pvmove command. Then use the vgreduce command to remove the physical volume:
The following command removes the physical volume /dev/hda1 from the volume group my_volume_group.
# vgreduce my_volume_group /dev/hda1
4.3.7. Changing the Parameters of a Volume Group
The following command changes the maximum number of logical volumes of volume group vg00 to 128.
vgchange -l 128 /dev/vg00
For a description of the volume group parameters you can change with the vgchange command, see the vgchange(8) man page.
4.3.8. Activating and Deactivating Volume Groups
When you create a volume group it is, by default, activated. This
means that the logical volumes in that group are accessible and subject
to change.
There are various circumstances for which you you need to make a
volume group inactive and thus unknown to the kernel. To deactivate or
activate a volume group, use the -a (--available) argument of the vgchange command.
The following example deactivates the volume group my_volume_group.
vgchange -a n my_volume_group
If clustered locking is enabled, add ’e’ to activate or deactivate a
volume group exclusively on one node or ’l’ to activate or/deactivate a
volume group only on the local node. Logical volumes with single-host
snapshots are always activated exclusively because they can only be used
on one node at once.
4.3.9. Removing Volume Groups
To remove a volume group that contains no logical volumes, use the vgremove command.
# vgremove officevg
  Volume group "officevg" successfully removed
4.3.10. Splitting a Volume Group
To split the physical volumes of a volume group and create a new volume group, use the vgsplit command.
Logical volumes cannot be split between volume groups. Each existing
logical volume must be entirely on the physical volumes forming either
the old or the new volume group. If necessary, however, you can use the pvmove command to force the split.
The following example splits off the new volume group smallvg from the original volume group bigvg.
# vgsplit bigvg smallvg /dev/ram15
  Volume group "smallvg" successfully split from "bigvg"
4.3.11. Combining Volume Groups
Two combine two volume groups into a single volume group, use the vgmerge
command. You can merge an inactive "source" volume with an active or an
inactive "destination" volume if the physical extent sizes of the
volume are equal and the physical and logical volume summaries of both
volume groups fit into the destination volume groups limits.
The following command merges the inactive volume group my_vg into the active or inactive volume group databases giving verbose runtime information.
vgmerge -v databases my_vg
4.3.12. Backing Up Volume Group Metadata
Metadata backups and archives are automatically created on every
volume group and logical volume configuration change unless disabled in
the lvm.conf file. By default, the metadata backup is stored in the /etc/lvm/backup file and the metadata archives are stored in the /etc/lvm/archives file. You can manually back up the metadata to the /etc/lvm/backup file with the vgcfgbackup command.
The vgcfrestore command restores the metadata of a volume group from the archive to all the physical volumes in the volume groups.
4.3.13. Renaming a Volume Group
Use the vgrename command to rename an existing volume group.
Either of the following commands renames the existing volume group vg02 to my_volume_group
vgrename /dev/vg02 /dev/my_volume_group
vgrename vg02 my_volume_group
4.3.14. Moving a Volume Group to Another System
You can move an entire LVM volume group to another system. It is recommended that you use the vgexport and vgimport commands when you do this.
The vgexport command makes an inactive volume group inaccessible to the system, which allows you to detach its physical volumes. The vgimport command makes a volume group accessible to a machine again after the vgexport command has made it inactive.
To move a volume group form one system to another, perform the following steps:
Make sure that no users are accessing files on the active volumes in the volume group, then unmount the logical volumes.
Use the -a n argument of the vgchange command to mark the volume group as inactive, which prevents any further activity on the volume group.
Use the vgexport command to export the volume group. This prevents it from being accessed by the system from which you are removing it.
After you export the volume group, the physical volume will show
up as being in an exported volume group when you execute the pvscan command, as in the following example.
[root@tng3-1]# pvscan
  PV /dev/sda1    is in exported VG myvg [17.15 GB / 7.15 GB free]
  PV /dev/sdc1    is in exported VG myvg [17.15 GB / 15.15 GB free]
  PV /dev/sdd1   is in exported VG myvg [17.15 GB / 15.15 GB free]
  ...
When the system is next shut down, you can unplug the disks that
constitute the volume group and connect them to the new system.
When the disks are plugged into the new system, use the vgimport command to import the volume group, making it accessible to the new system.
Activate the volume group with the -a y argument of the vgchange command.
Mount the file system to make it available for use.
4.3.15. Recreating a Volume Group Directory
To recreate a volume group directory and logical volume special files, use the vgmknodes command. This command checks the LVM2 special files in the /dev directory that are needed for active logical volumes. It creates any special files that are missing removes unused ones.
You can incorporate the vgmknodes command into the vgscan command by specifying the mknodes argument to the vgscan command.
4.4. Logical Volume Administration
This section describes the commands that perform the various aspects of logical volume administration.
4.4.1. Creating Linear Logical Volumes
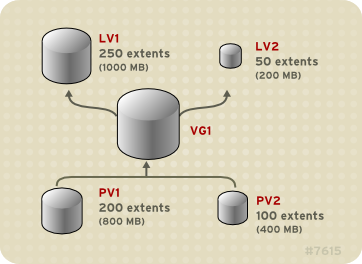
To create a logical volume, use the lvcreate command. If you do not specify a name for the logical volume, the default name lvol# is used where # is the internal number of the logical volume.
When you create a logical volume, the logical volume is carved from a
volume group using the free extents on the physical volumes that make
up the volume group. Normally logical volumes use up any space available
on the underlying physical volumes on a next-free basis. Modifying the
logical volume frees and reallocates space in the physical volumes.
The following command creates a logical volume 10 gigabytes in size in the volume group vg1.
lvcreate -L 10G vg1
The following command creates a 1500 megabyte linear logical volume named testlv in the volume group testvg, creating the block device /dev/testvg/testlv.
lvcreate -L1500 -n testlv testvg
The following command creates a 50 gigabyte logical volume named gfslv from the free extents in volume group vg0.
lvcreate -L 50G -n gfslv vg0
You can use the -l argument of the lvcreate
command to specify the size of the logical volume in extents. You can
also use this argument to specify the percentage of the volume group to
use for the logical volume. The following command creates a logical
volume called mylv that uses 60% of the total space in volume group testvol.
lvcreate -l 60%VG -n mylv testvg
You can also use the -l argument of the lvcreate
command to specify the percentage of the remaining free space in a
volume group as the size of the logical volume. The following command
creates a logical volume called yourlv that uses all of the unallocated space in the volume group testvol.
lvcreate -l 100%FREE -n yourlv testvg
You can use -l argument of the lvcreate
command to create a logical volume that uses the entire volume group.
Another way to create a logical volume that uses the entire volume group
is to use the vgdisplay command to find the "Total PE" size and to use those results as input to the lvcreate command.
The following commands create a logical volume called mylv that fills the volume group named testvg.
# vgdisplay testvg | grep "Total PE"
Total PE              10230
# lvcreate -l 10230 testvg -n mylv
The underlying physical volumes used to create a logical volume can
be important if the physical volume needs to be removed, so you may need
to consider this possibility when you create the logical volume. For
information on removing a physical volume from a volume group, see
Section 4.3.6, “Removing Physical Volumes from a Volume Group”.
To create a logical volume to be allocated from a specific physical
volume in the volume group, specify the physical volume or volumes at
the end at the lvcreate command line. The following command creates a logical volume named testlv in volume group testvg allocated from the physical volume /dev/sdg1,
lvcreate -L 1500 -ntestlv testvg /dev/sdg1
You can specify which extents of a physical volume are to be used
for a logical volume. The following example creates a linear logical
volume out of extents 0 through 25 of physical volume /dev/sda1 and extents 50 through 125 of physical volume /dev/sdb1 in volume group testvg.
lvcreate -l 100 -n testlv testvg /dev/sda1:0-25 /dev/sdb1:50-125
The following example creates a linear logical volume out of extents 0 through 25 of physical volume /dev/sda1 and then continues laying out the logical volume at extent 100.
lvcreate -l 100 -n testlv testvg /dev/sda1:0-25:100-
The default policy for how the extents of a logical volume are allocated is
inherit, which applies the same policy as for the volume group. These policies can be changed using the
lvchange command. For information on allocation policies, see
Section 4.3.1, “Creating Volume Groups”.
4.4.2. Creating Striped Volumes
For large sequential reads and writes, creating a striped logical
volume can improve the efficiency of the data I/O. For general
information about striped volumes, see
Section 2.3.2, “Striped Logical Volumes”.
When you create a striped logical volume, you specify the number of stripes with the -i argument of the lvcreate
command. This determines over how many physical volumes the logical
volume will be striped. The number of stripes cannot be greater than the
number of physical volumes in the volume group (unless the --alloc anywhere argument is used).
If the underlying physical devices that make up a striped logical
volume are different sizes, the maximum size of the striped volume is
determined by the smallest underlying device. For example, in a
two-legged stripe, the maximum size is twice the size of the smaller
device. In a three-legged stripe, the maximum size is three times the
size of the smallest device.
The following command creates a striped logical volume across 2
physical volumes with a stripe of 64kB. The logical volume is 50
gigabytes in size, is named gfslv, and is carved out of volume group vg0.
lvcreate -L 50G -i2 -I64 -n gfslv vg0
As with linear volumes, you can specify the extents of the physical
volume that you are using for the stripe. The following command creates a
striped volume 100 extents in size that stripes across two physical
volumes, is named stripelv and is in volume group testvg. The stripe will use sectors 0-50 of /dev/sda1 and sectors 50-100 of /dev/sdb1.
# lvcreate -l 100 -i2 -nstripelv testvg /dev/sda1:0-50 /dev/sdb1:50-100
  Using default stripesize 64.00 KB
  Logical volume "stripelv" created
4.4.3. Creating Mirrored Volumes
Creating a mirrored LVM logical volume in a cluster requires the
same commands and procedures as creating a mirrored LVM logical volume
on a single node. However, in order to create a mirrored LVM volume in a
cluster the cluster and cluster mirror infrastructure must be running,
the cluster must be quorate, and the locking type in the
lvm.conf file must be set correctly to enable cluster locking. For an example of creating a mirrored volume in a cluster, see
Section 5.5, “Creating a Mirrored LVM Logical Volume in a Cluster”.
When you create a mirrored volume, you specify the number of copies of the data to make with the -m argument of the lvcreate command. Specifying -m1 creates one mirror, which yields two copies of the file system: a linear logical volume plus one copy. Similarly, specifying -m2 creates two mirrors, yielding three copies of the file system.
The following command creates a mirrored logical volume with a single mirror. The volume is 50 gigabytes in size, is named mirrorlv, and is carved out of volume group vg0:
lvcreate -L 50G -m1 -n mirrorlv vg0
An LVM mirror divides the device being copied into regions that, by default, are 512KB in size. You can use the -R argument of the lvcreate command to specify the region size in MB. You can also change the default region size by editing the mirror_region_size setting in the lvm.conf file.
Due to limitations in the cluster infrastructure, cluster mirrors
greater than 1.5TB cannot be created with the default region size of
512KB. Users that require larger mirrors should increase the region size
from its default to something larger. Failure to increase the region
size will cause LVM creation to hang and may hang other LVM commands as
well.
As a general guideline for specifying the region size for mirrors
that are larger than 1.5TB, you could take your mirror size in terabytes
and round up that number to the next power of 2, using that number as
the -R argument to the lvcreate command. For example, if your mirror size is 1.5TB, you could specify -R 2. If your mirror size is 3TB, you could specify -R 4. For a mirror size of 5TB, you could specify -R 8.
The following command creates a mirrored logical volume with a region size of 2MB:
lvcreate -m1 -L 2T -R 2 -n mirror vol_group
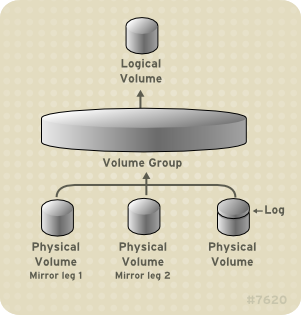
LVM maintains a small log which it uses to keep track of which
regions are in sync with the mirror or mirrors. By default, this log is
kept on disk, which keeps it persistent across reboots and ensures that
the mirror does not need to be re-synced every time a machine reboots or
crashes. You can specify instead that this log be kept in memory with
the --mirrorlog core argument; this
eliminates the need for an extra log device, but it requires that the
entire mirror be resynchronized at every reboot.
The following command creates a mirrored logical volume from the volume group bigvg. The logical volume is named ondiskmirvol and has a single mirror. The volume is 12MB in size and keeps the mirror log in memory.
# lvcreate -L 12MB -m1 --mirrorlog core -n ondiskmirvol bigvg
  Logical volume "ondiskmirvol" created
The mirror log is created on a separate device from the devices on
which any of the mirror legs are created. It is possible, however, to
create the mirror log on the same device as one of the mirror legs by
using the --alloc anywhere argument of the vgcreate command. This may degrade performance, but it allows you to create a mirror even if you have only two underlying devices.
The following command creates a mirrored logical volume with a
single mirror for which the mirror log is on the same device as one of
the mirror legs. In this example, the volume group vg0 consists of only two devices. This command creates a 500 megabyte volume named mirrorlv in the vg0 volume group.
lvcreate -L 500M -m1 -n mirrorlv -alloc anywhere vg0
To create a mirror log that is itself mirrored, you can specify the --mirrorlog mirrored argument. The following command creates a mirrored logical volume from the volume group bigvg. The logical volume is named twologvol and has a single mirror. The volume is 12MB in size and the mirror log is mirrored, with each log kept on a separate device.
# lvcreate -L 12MB -m1 --mirrorlog mirrored -n twologvol bigvg
  Logical volume "twologvol" created
Just as with a standard mirror log, it is possible to create the
redundant mirror logs on the same device as the mirror legs by using the
--alloc anywhere argument of the vgcreate
command. This may degrade performance, but it allows you to create a
redundant mirror log even if you do not have sufficient underlying
devices for each log to be kept on a separate device than the mirror
legs.
When a mirror is created, the mirror regions are synchronized. For
large mirror components, the sync process may take a long time. When you
are creating a new mirror that does not need to be revived, you can
specify the nosync argument to indicate that an initial synchronization from the first device is not required.
You can specify which devices to use for the mirror legs and log,
and which extents of the devices to use. To force the log onto a
particular disk, specify exactly one extent on the disk on which it will
be placed. LVM does not necessary respect the order in which devices
are listed in the command line. If any physical volumes are listed that
is the only space on which allocation will take place. Any physical
extents included in the list that are already allocated will get
ignored.
The following command creates a mirrored logical volume with a
single mirror and a single log that is not mirrored. The volume is 500
megabytes in size, it is named mirrorlv, and it is carved out of volume group vg0. The first leg of the mirror is on device /dev/sda1, the second leg of the mirror is on device /dev/sdb1, and the mirror log is on /dev/sdc1.
lvcreate -L 500M -m1 -n mirrorlv vg0 /dev/sda1 /dev/sdb1 /dev/sdc1
The following command creates a mirrored logical volume with a
single mirror. The volume is 500 megabytes in size, it is named mirrorlv, and it is carved out of volume group vg0. The first leg of the mirror is on extents 0 through 499 of device /dev/sda1, the second leg of the mirror is on extents 0 through 499 of device /dev/sdb1, and the mirror log starts on extent 0 of device /dev/sdc1. These are 1MB extents. If any of the specified extents have already been allocated, they will be ignored.
lvcreate -L 500M -m1 -n mirrorlv vg0 /dev/sda1:0-499 /dev/sdb1:0-499 /dev/sdc1:0
4.4.3.1. Mirrored Logical Volume Failure Policy
You can define how a mirrored logical volume behaves in the event of a device failure with the mirror_image_fault_policy and mirror_log_fault_policy parameters in the activation section of the lvm.conf file. When these parameters are set to remove, the system attempts to remove the faulty device and run without it. When this parameter is set to allocate,
the system attempts to remove the faulty device and tries to allocate
space on a new device to be a replacement for the failed device; this
policy acts like the remove policy if no suitable device and space can be allocated for the replacement.
By default, the mirror_log_fault_policy parameter is set to allocate.
Using this policy for the log is fast and maintains the ability to
remember the sync state through crashes and reboots. If you set this
policy to remove, when a log device fails
the mirror converts to using an in-memory log and the mirror will not
remember its sync status across crashes and reboots and the entire
mirror will be re-synced.
By default, the mirror_image_fault_policy parameter is set to remove.
With this policy, if a mirror image fails the mirror will convert to a
non-mirrored device if there is only one remaining good copy. Set this
policy to allocate for a mirror device is
slow, as it requires the mirror to resynchronize the devices, but it
will preserve the mirror characteristic of the device.
4.4.3.2. Splitting Off a Redundant Image of a Mirrored Logical Volume
You can split off a redundant image of a mirrored logical volume to
form a new logical volume. To split off an image, you use the --splitmirrors argument of the lvconvert command, specifying the number of of redundant images to split off. You must use the --name argument of the command to specify a name for the newly-split-off logical volume.
The following command splits off a new logical volume named copy from the mirrored logical volume vg/lv. The new logical volume contains two mirror legs. In this example, LVM selects which devices to split off.
lvconvert --splitmirrors 2 --name copy vg/lv
You can specify which devices to split off. The following command splits off a new logical volume named copy from the mirrored logical volume vg/lv. The new logical volume contains two mirror legs consisting of devices /dev/sdc1 and /dev/sde1.
lvconvert --splitmirrors 2 --name copy vg/lv /dev/sd[ce]1
4.4.3.3. Repairing a Mirrored Logical Device
You can use the lvconvert --repair command to repair a mirror after a disk failure. This brings the mirror back into a consistent state. The lvconvert --repair
command is an interactive command that prompts you to indicate whether
you want the system to attempt to replace any failed devices.
To skip the prompts and replace all of the failed devices, specify the -y option on the command line.
To skip the prompts and replace none of the failed devices, specify the -f option on the command line.
To skip the prompts and still indicate different replacement
policies for the mirror image and the mirror log, you can specify the --use-policies argument to use the device replacement policies specified by the mirror_log_fault_policy and mirror_device_fault_policy parameters in the lvm.conf file.
4.4.4. Creating Snapshot Volumes
Use the -s argument of the lvcreate command to create a snapshot volume. A snapshot volume is writeable.
LVM snapshots are not supported across the nodes in a cluster. You
cannot create a snapshot volume in a clustered volume group.
LVM snapshots are not supported for mirrored logical volumes.
The following command creates a snapshot logical volume that is 100 megabytes in size named /dev/vg00/snap. This creates a snapshot of the origin logical volume named /dev/vg00/lvol1.
If the original logical volume contains a file system, you can mount
the snapshot logical volume on an arbitrary directory in order to access
the contents of the file system to run a backup while the original file
system continues to get updated.
lvcreate --size 100M --snapshot --name snap /dev/vg00/lvol1
After you create a snapshot logical volume, specifying the origin volume on the lvdisplay command yields output that includes a a list of all snapshot logical volumes and their status (active or inactive).
The following example shows the status of the logical volume /dev/new_vg/lvol0, for which a snapshot volume /dev/new_vg/newvgsnap has been created.
# lvdisplay /dev/new_vg/lvol0
  --- Logical volume ---
  LV Name                /dev/new_vg/lvol0
  VG Name                new_vg
  LV UUID                LBy1Tz-sr23-OjsI-LT03-nHLC-y8XW-EhCl78
  LV Write Access        read/write
  LV snapshot status     source of
                         /dev/new_vg/newvgsnap1 [active]
  LV Status              available
  # open                 0
  LV Size                52.00 MB
  Current LE             13
  Segments               1
  Allocation             inherit
  Read ahead sectors     0
  Block device           253:2
The lvs command, by default, displays
the origin volume and the current percentage of the snapshot volume
being used for each snapshot volume. The following example shows the
default output for the lvs command for a system that includes the logical volume /dev/new_vg/lvol0, for which a snapshot volume /dev/new_vg/newvgsnap has been created.
# lvs
  LV         VG     Attr   LSize  Origin Snap%  Move Log Copy%
  lvol0      new_vg owi-a- 52.00M
  newvgsnap1 new_vg swi-a-  8.00M lvol0    0.20
Because the snapshot increases in size as the origin volume
changes, it is important to monitor the percentage of the snapshot
volume regularly with the lvs command to be
sure it does not fill. A snapshot that is 100% full is lost completely,
as a write to unchanged parts of the origin would be unable to succeed
without corrupting the snapshot.
4.4.5. Merging Snapshot Volumes
As of the Red Hat Enterprise Linux 6 release, you can use the --merge option of the lvconvert
command to merge a snapshot into its origin volume. If both the origin
and snapshot volume are not open, the merge will start immediately.
Otherwise, the merge will start the first time either the origin or
snapshot are activated and both are closed. Merging a snapshot into an
origin that cannot be closed, for example a root filesystem, is deferred
until the next time the origin volume is activated. When merging
starts, the resulting logical volume will have the origin’s name, minor
number and UUID. While the merge is in progress, reads or writes to the
origin appear as they were directed to the snapshot being merged. When
the merge finishes, the merged snapshot is removed.
The following command merges snapshot volume vg00/lvol1_snap into its origin.
lvconvert --merge vg00/lvol1_snap"
You can specify multiple snapshots on the command line, or you can
use LVM object tags to specify that multiple snapshots be merged to
their respective origins. In the following example, logical volumes vg00/lvol1, vg00/lvol2, and vg00/lvol3 are all tagged with the tag @some_tag". The following command merges the snapshop logical volumes for all three volumes serially: vg00/lvol1, then vg00/lvol2, then vg00/lvol3. If the --background option were used, all snapshot logical volume merges would start in parallel.
lvconvert --merge @some_tag"
For information on tagging LVM objects, see
Appendix C, LVM Object Tags. For further information on the
lvconvert --merge command, see the
lvconvert(8) man page.
4.4.6. Persistent Device Numbers
Major and minor device numbers are allocated dynamically at module
load. Some applications work best if the block device always is
activated with the same device (major and minor) number. You can specify
these with the lvcreate and the lvchange commands by using the following arguments:
--persistent y --major major --minor minor
Use a large minor number to be sure that it hasn't already been allocated to another device dynamically.
If you are exporting a file system using NFS, specifying the fsid parameter in the exports file may avoid the need to set a persistent device number within LVM.
4.4.7. Resizing Logical Volumes
To reduce the size of a logical volume, use the lvreduce
command. If the logical volume contains a file system, be sure to
reduce the file system first (or use the LVM GUI) so that the logical
volume is always at least as large as the file system expects it to be.
The following command reduces the size of logical volume lvol1 in volume group vg00 by 3 logical extents.
lvreduce -l -3 vg00/lvol1
4.4.8. Changing the Parameters of a Logical Volume Group
To change the parameters of a logical volume, use the lvchange command. For a listing of the parameters you can change, see the lvchange(8) man page.
The following command changes the permission on volume lvol1 in volume group vg00 to be read-only.
lvchange -pr vg00/lvol1
4.4.9. Renaming Logical Volumes
To rename an existing logical volume, use the lvrename command.
Either of the following commands renames logical volume lvold in volume group vg02 to lvnew.
lvrename /dev/vg02/lvold /dev/vg02/lvnew
lvrename vg02 lvold lvnew
4.4.10. Removing Logical Volumes
To remove an inactive logical volume, use the lvremove
command. If the logical volume is currently mounted, unmount the volume
before removing it. In addition, in a clustered environment you must
deactivate a logical volume before it can be removed.
The following command removes the logical volume /dev/testvg/testlv from the volume group testvg. Note that in this case the logical volume has not been deactivated.
[root@tng3-1 lvm]# lvremove /dev/testvg/testlv
Do you really want to remove active logical volume "testlv"? [y/n]: y
  Logical volume "testlv" successfully removed
You could explicitly deactivate the logical volume before removing it with the lvchange -an command, in which case you would not see the prompt verifying whether you want to remove an active logical volume.
4.4.11. Displaying Logical Volumes
There are three commands you can use to display properties of LVM logical volumes: lvs, lvdisplay, and lvscan.
The
lvs command provides logical volume information in a configurable form, displaying one line per logical volume. The
lvs command provides a great deal of format control, and is useful for scripting. For information on using the
lvs command to customize your output, see
Section 4.8, “Customized Reporting for LVM”.
The lvdisplay command displays logical volume properties (such as size, layout, and mapping) in a fixed format.
The following command shows the attributes of lvol2 in vg00.
If snapshot logical volumes have been created for this original logical
volume, this command shows a list of all snapshot logical volumes and
their status (active or inactive) as well.
lvdisplay -v /dev/vg00/lvol2
The lvscan command scans for all logical volumes in the system and lists them, as in the following example.
# lvscan
 ACTIVE                   '/dev/vg0/gfslv' [1.46 GB] inherit
4.4.12. Growing Logical Volumes
To increase the size of a logical volume, use the lvextend command.
After extending the logical volume, you will need to increase the size of the associated file system to match.
When you extend the logical volume, you can indicate how much you
want to extend the volume, or how large you want it to be after you
extend it.
The following command extends the logical volume /dev/myvg/homevol to 12 gigabytes.
# lvextend -L12G /dev/myvg/homevol
lvextend -- extending logical volume "/dev/myvg/homevol" to 12 GB
lvextend -- doing automatic backup of volume group "myvg"
lvextend -- logical volume "/dev/myvg/homevol" successfully extended
The following command adds another gigabyte to the logical volume /dev/myvg/homevol.
# lvextend -L+1G /dev/myvg/homevol
lvextend -- extending logical volume "/dev/myvg/homevol" to 13 GB
lvextend -- doing automatic backup of volume group "myvg"
lvextend -- logical volume "/dev/myvg/homevol" successfully extended
As with the lvcreate command, you can use the -l argument of the lvextend
command to specify the number of extents by which to increase the size
of the logical volume. You can also use this argument to specify a
percentage of the volume group, or a percentage of the remaining free
space in the volume group. The following command extends the logical
volume called testlv to fill all of the unallocated space in the volume group myvg.
[root@tng3-1 ~]# lvextend -l +100%FREE /dev/myvg/testlv
  Extending logical volume testlv to 68.59 GB
  Logical volume testlv successfully resized
After you have extended the logical volume it is necessary to increase the file system size to match.
By default, most file system resizing tools will increase the size
of the file system to be the size of the underlying logical volume so
you do not need to worry about specifying the same size for each of the
two commands.
4.4.13. Extending a Striped Volume
In order to increase the size of a striped logical volume, there
must be enough free space on the underlying physical volumes that make
up the volume group to support the stripe. For example, if you have a
two-way stripe that that uses up an entire volume group, adding a single
physical volume to the volume group will not enable you to extend the
stripe. Instead, you must add at least two physical volumes to the
volume group.
For example, consider a volume group vg that consists of two underlying physical volumes, as displayed with the following vgs command.
# vgs
  VG   #PV #LV #SN Attr   VSize   VFree
  vg     2   0   0 wz--n- 271.31G 271.31G
You can create a stripe using the entire amount of space in the volume group.
# lvcreate -n stripe1 -L 271.31G -i 2 vg
  Using default stripesize 64.00 KB
  Rounding up size to full physical extent 271.31 GB
  Logical volume "stripe1" created
# lvs -a -o +devices
  LV      VG   Attr   LSize   Origin Snap%  Move Log Copy%  Devices
  stripe1 vg   -wi-a- 271.31G                               /dev/sda1(0),/dev/sdb1(0)
Note that the volume group now has no more free space.
# vgs
  VG   #PV #LV #SN Attr   VSize   VFree
  vg     2   1   0 wz--n- 271.31G    0
The following command adds another physical volume to the volume group, which then has 135G of additional space.
# vgextend vg /dev/sdc1
  Volume group "vg" successfully extended
# vgs
  VG   #PV #LV #SN Attr   VSize   VFree
  vg     3   1   0 wz--n- 406.97G 135.66G
At this point you cannot extend the striped logical volume to the
full size of the volume group, because two underlying devices are needed
in order to stripe the data.
# lvextend vg/stripe1 -L 406G
  Using stripesize of last segment 64.00 KB
  Extending logical volume stripe1 to 406.00 GB
  Insufficient suitable allocatable extents for logical volume stripe1: 34480
more required
To extend the striped logical volume, add another physical volume
and then extend the logical volume. In this example, having added two
physical volumes to the volume group we can extend the logical volume to
the full size of the volume group.
# vgextend vg /dev/sdd1
  Volume group "vg" successfully extended
# vgs
  VG   #PV #LV #SN Attr   VSize   VFree
  vg     4   1   0 wz--n- 542.62G 271.31G
# lvextend vg/stripe1 -L 542G
  Using stripesize of last segment 64.00 KB
  Extending logical volume stripe1 to 542.00 GB
  Logical volume stripe1 successfully resized
If you do not have enough underlying physical devices to extend the
striped logical volume, it is possible to extend the volume anyway if it
does not matter that the extension is not striped, which may result in
uneven performance. When adding space to the logical volume, the default
operation is to use the same striping parameters of the last segment of
the existing logical volume, but you can override those parameters. The
following example extends the existing striped logical volume to use
the remaining free space after the initial lvextend command fails.
# lvextend vg/stripe1 -L 406G
  Using stripesize of last segment 64.00 KB
  Extending logical volume stripe1 to 406.00 GB
  Insufficient suitable allocatable extents for logical volume stripe1: 34480
more required
# lvextend -i1 -l+100%FREE vg/stripe1
4.4.14. Shrinking Logical Volumes
To reduce the size of a logical volume, first unmount the file system. You can then use the lvreduce command to shrink the volume. After shrinking the volume, remount the file system.
It is important to reduce the size of the file system or whatever
is residing in the volume before shrinking the volume itself, otherwise
you risk losing data.
Shrinking a logical volume frees some of the volume group to be allocated to other logical volumes in the volume group.
The following example reduces the size of logical volume lvol1 in volume group vg00 by 3 logical extents.
lvreduce -l -3 vg00/lvol1
4.5. Controlling LVM Device Scans with Filters
At startup, the vgscan command is run to
scan the block devices on the system looking for LVM labels, to
determine which of them are physical volumes and to read the metadata
and build up a list of volume groups. The names of the physical volumes
are stored in the cache file of each node in the system, /etc/lvm/.cache. Subsequent commands may read that file to avoiding rescanning.
You can control which devices LVM scans by setting up filters in the lvm.conf configuration file. The filters in the lvm.conf file consist of a series of simple regular expressions that get applied to the device names that are in the /dev directory to decide whether to accept or reject each block device found.
The following examples show the use of filters to control which
devices LVM scans. Note that some of these examples do not necessarily
represent best practice, as the regular expressions are matched freely
against the complete pathname. For example, a/loop/ is equivalent to a/.*loop.*/ and would match /dev/solooperation/lvol1.
The following filter adds all discovered devices, which is the
default behavior as there is no filter configured in the configuration
file:
filter = [ "a/.*/" ]
The following filter removes the cdrom device in order to avoid delays if the drive contains no media:
filter = [ "r|/dev/cdrom|" ]
The following filter adds all loop and removes all other block devices:
filter = [ "a/loop.*/", "r/.*/" ]
The following filter adds all loop and IDE and removes all other block devices:
filter =[ "a|loop.*|", "a|/dev/hd.*|", "r|.*|" ]
The following filter adds just partition 8 on the first IDE drive and removes all other block devices:
filter = [ "a|^/dev/hda8$|", "r/.*/" ]
4.8. Customized Reporting for LVM
You can produce concise and customizable reports of LVM objects with the pvs, lvs, and vgs
commands. The reports that these commands generate include one line of
output for each object. Each line contains an ordered list of fields of
properties related to the object. There are five ways to select the
objects to be reported: by physical volume, volume group, logical
volume, physical volume segment, and logical volume segment.
The following sections provide:
A summary of command arguments you can use to control the format of the generated report.
A list of the fields you can select for each LVM object.
A summary of command arguments you can use to sort the generated report.
Instructions for specifying the units of the report output.
This section provides a series of tables that list the information you can display about the LVM objects with the pvs, vgs, and lvs commands.
For convenience, a field name prefix can be dropped if it matches the default for the command. For example, with the pvs command, name means pv_name, but with the vgs command, name is interpreted as vg_name.
Executing the following command is the equivalent of executing pvs -o pv_free.
# pvs -o +free
PFree
17.14G
17.09G
17.14G
Table 4.1, “pvs Display Fields” lists the display arguments of the
pvs command, along with the field name as it appears in the header display and a description of the field.
Table 4.1. pvs Display Fields
|
Argument
|
Header
|
Description
|
|---|
dev_size
|
DevSize
|
The size of the underlying device on which the physical volume was created
|
pe_start
|
1st PE
|
Offset to the start of the first physical extent in the underlying device
|
pv_attr
|
Attr
|
Status of the physical volume: (a)llocatable or e(x)ported.
|
pv_fmt
|
Fmt
|
The metadata format of the physical volume (lvm2 or lvm1)
|
pv_free
|
PFree
|
The free space remaining on the physical volume
|
pv_name
|
PV
|
The physical volume name
|
pv_pe_alloc_count
|
Alloc
|
Number of used physical extents
|
pv_pe_count
|
PE
|
Number of physical extents
|
pvseg_size
|
SSize
|
The segment size of the physical volume
|
pvseg_start
|
Start
|
The starting physical extent of the physical volume segment
|
pv_size
|
PSize
|
The size of the physical volume
|
pv_tags
|
PV Tags
|
LVM tags attached to the physical volume
|
pv_used
|
Used
|
The amount of space currently used on the physical volume
|
pv_uuid
|
PV UUID
|
The UUID of the physical volume
|
The pvs command displays the following fields by default: pv_name, vg_name, pv_fmt, pv_attr, pv_size, pv_free. The display is sorted by pv_name.
# pvs
PV VG Fmt Attr PSize PFree
/dev/sdb1 new_vg lvm2 a- 17.14G 17.14G
/dev/sdc1 new_vg lvm2 a- 17.14G 17.09G
/dev/sdd1 new_vg lvm2 a- 17.14G 17.13G
Using the -v argument with the pvs command adds the following fields to the default display: dev_size, pv_uuid.
# pvs -v
Scanning for physical volume names
PV VG Fmt Attr PSize PFree DevSize PV UUID
/dev/sdb1 new_vg lvm2 a- 17.14G 17.14G 17.14G onFF2w-1fLC-ughJ-D9eB-M7iv-6XqA-dqGeXY
/dev/sdc1 new_vg lvm2 a- 17.14G 17.09G 17.14G Joqlch-yWSj-kuEn-IdwM-01S9-XO8M-mcpsVe
/dev/sdd1 new_vg lvm2 a- 17.14G 17.13G 17.14G yvfvZK-Cf31-j75k-dECm-0RZ3-0dGW-tUqkCS
You can use the --segments argument of the pvs
command to display information about each physical volume segment. A
segment is a group of extents. A segment view can be useful if you want
to see whether your logical volume is fragmented.
The pvs --segments command displays the following fields by default: pv_name, vg_name, pv_fmt, pv_attr, pv_size, pv_free, pvseg_start, pvseg_size. The display is sorted by pv_name and pvseg_size within the physical volume.
# pvs --segments
PV VG Fmt Attr PSize PFree Start SSize
/dev/hda2 VolGroup00 lvm2 a- 37.16G 32.00M 0 1172
/dev/hda2 VolGroup00 lvm2 a- 37.16G 32.00M 1172 16
/dev/hda2 VolGroup00 lvm2 a- 37.16G 32.00M 1188 1
/dev/sda1 vg lvm2 a- 17.14G 16.75G 0 26
/dev/sda1 vg lvm2 a- 17.14G 16.75G 26 24
/dev/sda1 vg lvm2 a- 17.14G 16.75G 50 26
/dev/sda1 vg lvm2 a- 17.14G 16.75G 76 24
/dev/sda1 vg lvm2 a- 17.14G 16.75G 100 26
/dev/sda1 vg lvm2 a- 17.14G 16.75G 126 24
/dev/sda1 vg lvm2 a- 17.14G 16.75G 150 22
/dev/sda1 vg lvm2 a- 17.14G 16.75G 172 4217
/dev/sdb1 vg lvm2 a- 17.14G 17.14G 0 4389
/dev/sdc1 vg lvm2 a- 17.14G 17.14G 0 4389
/dev/sdd1 vg lvm2 a- 17.14G 17.14G 0 4389
/dev/sde1 vg lvm2 a- 17.14G 17.14G 0 4389
/dev/sdf1 vg lvm2 a- 17.14G 17.14G 0 4389
/dev/sdg1 vg lvm2 a- 17.14G 17.14G 0 4389
You can use the pvs -a command to see devices detected by LVM that have not been initialized as LVM physical volumes.
# pvs -a
PV VG Fmt Attr PSize PFree
/dev/VolGroup00/LogVol01 -- 0 0
/dev/new_vg/lvol0 -- 0 0
/dev/ram -- 0 0
/dev/ram0 -- 0 0
/dev/ram2 -- 0 0
/dev/ram3 -- 0 0
/dev/ram4 -- 0 0
/dev/ram5 -- 0 0
/dev/ram6 -- 0 0
/dev/root -- 0 0
/dev/sda -- 0 0
/dev/sdb -- 0 0
/dev/sdb1 new_vg lvm2 a- 17.14G 17.14G
/dev/sdc -- 0 0
/dev/sdc1 new_vg lvm2 a- 17.14G 17.09G
/dev/sdd -- 0 0
/dev/sdd1 new_vg lvm2 a- 17.14G 17.14G
Table 4.2, “vgs Display Fields” lists the display arguments of the
vgs command, along with the field name as it appears in the header display and a description of the field.
Table 4.2. vgs Display Fields
|
Argument
|
Header
|
Description
|
|---|
lv_count
|
#LV
|
The number of logical volumes the volume group contains
|
max_lv
|
MaxLV
|
The maximum number of logical volumes allowed in the volume group (0 if unlimited)
|
max_pv
|
MaxPV
|
The maximum number of physical volumes allowed in the volume group (0 if unlimited)
|
pv_count
|
#PV
|
The number of physical volumes that define the volume group
|
snap_count
|
#SN
|
The number of snapshots the volume group contains
|
vg_attr
|
Attr
|
Status of the volume group: (w)riteable, (r)eadonly, resi(z)eable, e(x)ported, (p)artial and (c)lustered.
|
vg_extent_count
|
#Ext
|
The number of physical extents in the volume group
|
vg_extent_size
|
Ext
|
The size of the physical extents in the volume group
|
vg_fmt
|
Fmt
|
The metadata format of the volume group (lvm2 or lvm1)
|
vg_free
|
VFree
|
Size of the free space remaining in the volume group
|
vg_free_count
|
Free
|
Number of free physical extents in the volume group
|
vg_name
|
VG
|
The volume group name
|
vg_seqno
|
Seq
|
Number representing the revision of the volume group
|
vg_size
|
VSize
|
The size of the volume group
|
vg_sysid
|
SYS ID
|
LVM1 System ID
|
vg_tags
|
VG Tags
|
LVM tags attached to the volume group
|
vg_uuid
|
VG UUID
|
The UUID of the volume group
|
The vgs command displays the following fields by default: vg_name, pv_count, lv_count, snap_count, vg_attr, vg_size, vg_free. The display is sorted by vg_name.
# vgs
VG #PV #LV #SN Attr VSize VFree
new_vg 3 1 1 wz--n- 51.42G 51.36G
Using the -v argument with the vgs command adds the following fields to the default display: vg_extent_size, vg_uuid.
# vgs -v
Finding all volume groups
Finding volume group "new_vg"
VG Attr Ext #PV #LV #SN VSize VFree VG UUID
new_vg wz--n- 4.00M 3 1 1 51.42G 51.36G jxQJ0a-ZKk0-OpMO-0118-nlwO-wwqd-fD5D32
Table 4.3, “lvs Display Fields” lists the display arguments of the
lvs command, along with the field name as it appears in the header display and a description of the field.
Table 4.3. lvs Display Fields
|
Argument
|
Header
|
Description
|
|---|
|
|
Chunk
|
Unit size in a snapshot volume
|
copy_percent
|
Copy%
|
The synchronization percentage of a mirrored logical volume; also used when physical extents are being moved with the pv_move command
|
devices
|
Devices
|
The underlying devices that make up the logical volume: the
physical volumes, logical volumes, and start physical extents and
logical extents
|
lv_attr
|
Attr
|
The status of the logical volume. The logical volume attribute bits are as follows:
| Bit 1: Volume type: (m)irrored, (M)irrored without initial sync, (o)rigin, (p)vmove, (s)napshot, invalid (S)napshot, (v)irtual | | Bit 2: Permissions: (w)riteable, (r)ead-only |
Bit 3: Allocation policy: (c)ontiguous, (n)ormal, (a)nywhere,
(i)nherited. This is capitalized if the volume is currently locked
against allocation changes, for example while executing the pvmove command. | | Bit 4: fixed (m)inor | |
Bit 5: State: (a)ctive, (s)uspended, (I)nvalid snapshot, invalid
(S)uspended snapshot, mapped (d)evice present without tables, mapped
device present with (i)nactive table | | Bit 6: device (o)pen |
|
lv_kernel_major
|
KMaj
|
Actual major device number of the logical volume (-1 if inactive)
|
lv_kernel_minor
|
KMIN
|
Actual minor device number of the logical volume (-1 if inactive)
|
lv_major
|
Maj
|
The persistent major device number of the logical volume (-1 if not specified)
|
lv_minor
|
Min
|
The persistent minor device number of the logical volume (-1 if not specified)
|
lv_name
|
LV
|
The name of the logical volume
|
lv_size
|
LSize
|
The size of the logical volume
|
lv_tags
|
LV Tags
|
LVM tags attached to the logical volume
|
lv_uuid
|
LV UUID
|
The UUID of the logical volume.
|
mirror_log
|
Log
|
Device on which the mirror log resides
|
modules
|
Modules
|
Corresponding kernel device-mapper target necessary to use this logical volume
|
move_pv
|
Move
|
Source physical volume of a temporary logical volume created with the pvmove command
|
origin
|
Origin
|
The origin device of a snapshot volume
|
|
|
Region
|
The unit size of a mirrored logical volume
|
seg_count
|
#Seg
|
The number of segments in the logical volume
|
seg_size
|
SSize
|
The size of the segments in the logical volume
|
seg_start
|
Start
|
Offset of the segment in the logical volume
|
seg_tags
|
Seg Tags
|
LVM tags attached to the segments of the logical volume
|
segtype
|
Type
|
The segment type of a logical volume (for example: mirror, striped, linear)
|
snap_percent
|
Snap%
|
Current percentage of a snapshot volume that is in use
|
stripes
|
#Str
|
Number of stripes or mirrors in a logical volume
|
|
|
Stripe
|
Unit size of the stripe in a striped logical volume
|
The lvs command displays the following fields by default: lv_name, vg_name, lv_attr, lv_size, origin, snap_percent, move_pv, mirror_log, copy_percent. The default display is sorted by vg_name and lv_name within the volume group.
# lvs
LV VG Attr LSize Origin Snap% Move Log Copy%
lvol0 new_vg owi-a- 52.00M
newvgsnap1 new_vg swi-a- 8.00M lvol0 0.20
Using the -v argument with the lvs command adds the following fields to the default display: seg_count, lv_major, lv_minor, lv_kernel_major, lv_kernel_minor, lv_uuid.
# lvs -v
Finding all logical volumes
LV VG #Seg Attr LSize Maj Min KMaj KMin Origin Snap% Move Copy% Log LV UUID
lvol0 new_vg 1 owi-a- 52.00M -1 -1 253 3 LBy1Tz-sr23-OjsI-LT03-nHLC-y8XW-EhCl78
newvgsnap1 new_vg 1 swi-a- 8.00M -1 -1 253 5 lvol0 0.20 1ye1OU-1cIu-o79k-20h2-ZGF0-qCJm-CfbsIx
You can use the --segments argument of the lvs command to display information with default columns that emphasize the segment information. When you use the segments argument, the seg prefix is optional. The lvs --segments command displays the following fields by default: lv_name, vg_name, lv_attr, stripes, segtype, seg_size. The default display is sorted by vg_name, lv_name within the volume group, and seg_start within the logical volume. If the logical volumes were fragmented, the output from this command would show that.
# lvs --segments
LV VG Attr #Str Type SSize
LogVol00 VolGroup00 -wi-ao 1 linear 36.62G
LogVol01 VolGroup00 -wi-ao 1 linear 512.00M
lv vg -wi-a- 1 linear 104.00M
lv vg -wi-a- 1 linear 104.00M
lv vg -wi-a- 1 linear 104.00M
lv vg -wi-a- 1 linear 88.00M
Using the -v argument with the lvs --segments command adds the following fields to the default display: seg_start, stripesize, chunksize.
# lvs -v --segments
Finding all logical volumes
LV VG Attr Start SSize #Str Type Stripe Chunk
lvol0 new_vg owi-a- 0 52.00M 1 linear 0 0
newvgsnap1 new_vg swi-a- 0 8.00M 1 linear 0 8.00K
The following example shows the default output of the lvs command on a system with one logical volume configured, followed by the default output of the lvs command with the segments argument specified.
# lvs
LV VG Attr LSize Origin Snap% Move Log Copy%
lvol0 new_vg -wi-a- 52.00M
# lvs --segments
LV VG Attr #Str Type SSize
lvol0 new_vg -wi-a- 1 linear 52.00M
4.8.3. Sorting LVM Reports
Normally the entire output of the lvs, vgs, or pvs command has to be generated and stored internally before it can be sorted and columns aligned correctly. You can specify the --unbuffered argument to display unsorted output as soon as it is generated.
To specify an alternative ordered list of columns to sort on, use the -O argument of any of the reporting commands. It is not necessary to include these fields within the output itself.
The following example shows the output of the pvs command that displays the physical volume name, size, and free space.
# pvs -o pv_name,pv_size,pv_free
PV PSize PFree
/dev/sdb1 17.14G 17.14G
/dev/sdc1 17.14G 17.09G
/dev/sdd1 17.14G 17.14G
The following example shows the same output, sorted by the free space field.
# pvs -o pv_name,pv_size,pv_free -O pv_free
PV PSize PFree
/dev/sdc1 17.14G 17.09G
/dev/sdd1 17.14G 17.14G
/dev/sdb1 17.14G 17.14G
The following example shows that you do not need to display the field on which you are sorting.
# pvs -o pv_name,pv_size -O pv_free
PV PSize
/dev/sdc1 17.14G
/dev/sdd1 17.14G
/dev/sdb1 17.14G
To display a reverse sort, precede a field you specify after the -O argument with the - character.
# pvs -o pv_name,pv_size,pv_free -O -pv_free
PV PSize PFree
/dev/sdd1 17.14G 17.14G
/dev/sdb1 17.14G 17.14G
/dev/sdc1 17.14G 17.09G
To specify the unit for the LVM report display, use the --units
argument of the report command. You can specify (b)ytes, (k)ilobytes,
(m)egabytes, (g)igabytes, (t)erabytes, (e)xabytes, (p)etabytes, and
(h)uman-readable. The default display is human-readable. You can
override the default by setting the units parameter in the global section of the lvm.conf file.
The following example specifies the output of the pvs command in megabytes rather than the default gigabytes.
# pvs --units m
PV VG Fmt Attr PSize PFree
/dev/sda1 lvm2 -- 17555.40M 17555.40M
/dev/sdb1 new_vg lvm2 a- 17552.00M 17552.00M
/dev/sdc1 new_vg lvm2 a- 17552.00M 17500.00M
/dev/sdd1 new_vg lvm2 a- 17552.00M 17552.00M
By default, units are displayed in powers of 2 (multiples of 1024).
You can specify that units be displayed in multiples of 1000 by
capitalizing the unit specification (B, K, M, G, T, H).
The following command displays the output as a multiple of 1024, the default behavior.
# pvs
  PV         VG     Fmt  Attr PSize  PFree
  /dev/sdb1  new_vg lvm2 a-   17.14G 17.14G
  /dev/sdc1  new_vg lvm2 a-   17.14G 17.09G
  /dev/sdd1  new_vg lvm2 a-   17.14G 17.14G
The following command displays the output as a multiple of 1000.
#  pvs --units G
  PV         VG     Fmt  Attr PSize  PFree
  /dev/sdb1  new_vg lvm2 a-   18.40G 18.40G
  /dev/sdc1  new_vg lvm2 a-   18.40G 18.35G
  /dev/sdd1  new_vg lvm2 a-   18.40G 18.40G
You can also specify (s)ectors (defined as 512 bytes) or custom units.
The following example displays the output of the pvs command as a number of sectors.
# pvs --units s
  PV         VG     Fmt  Attr PSize     PFree
  /dev/sdb1  new_vg lvm2 a-   35946496S 35946496S
  /dev/sdc1  new_vg lvm2 a-   35946496S 35840000S
  /dev/sdd1  new_vg lvm2 a-   35946496S 35946496S
The following example displays the output of the pvs command in units of 4 megabytes.
# pvs --units 4m
  PV         VG     Fmt  Attr PSize    PFree
  /dev/sdb1  new_vg lvm2 a-   4388.00U 4388.00U
  /dev/sdc1  new_vg lvm2 a-   4388.00U 4375.00U
  /dev/sdd1  new_vg lvm2 a-   4388.00U 4388.00U